My Sacred Space
Have you studied at a School for Witches? Are you considering?

I’ve delved into a couple of the more well-known schools, and have not yet found the one for me, but I do take valuable learning experiences from all sources.
With so many paths, there are many choices: online, group, personal mentor. It can be difficult to choose!
Here are some good starting places if you’re toying with the idea.


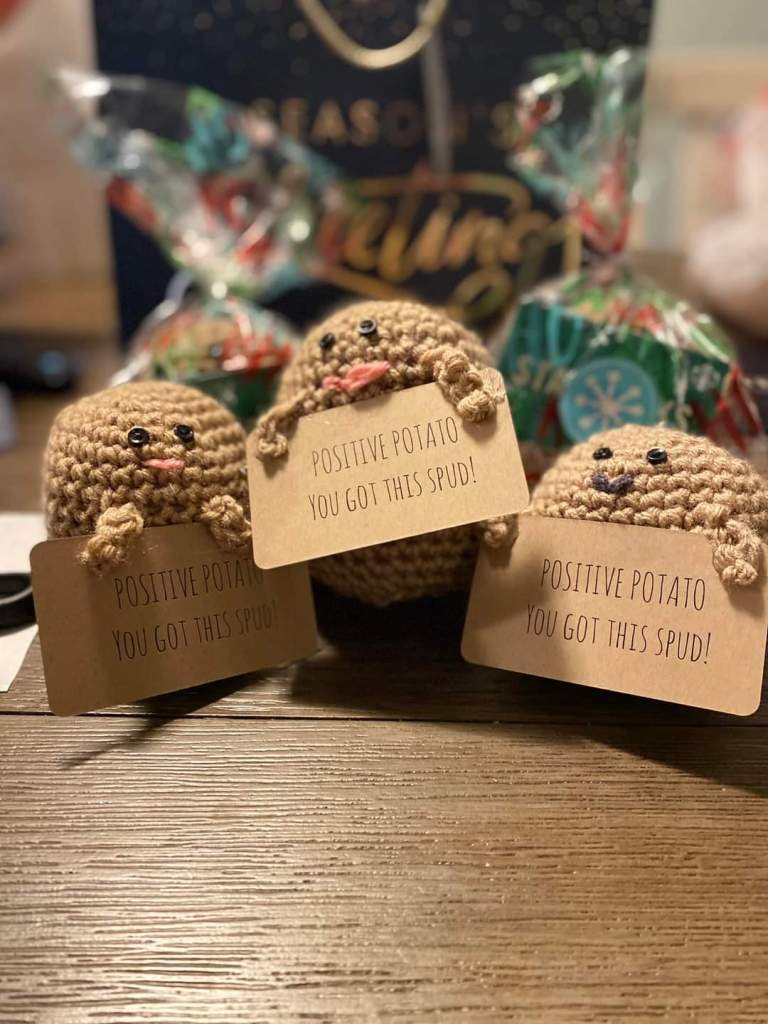
We made these cute little PosiTaters for our awesome team.
Just because. Everyone can use a little reminder now and then.
If you’d like one, just say so!

This is wonderful. In Wicca, as in other Traditions, the Words sometimes get in the way. Evoking oneness without them, without symbols or chantings or other disguises of the consciousness….THIS is perfect. Please read this selection shared from Kaos Butterfly. It may change the way you see things from here.

This is an approach to the traditional Wiccan calling of the elements, sans all causal forms—that is, it uses no words, no symbols, no forms or anything of that nature. It relies entirely on one’s fluency with energy, how well developed the astral senses are, and an empathy with the elements and with Nature—nothing that can be obtained from a book or some religion. This is just the basic outline, and it assume one will have the skill to know what to do with it all.
Enter a deep trance.
Facing east – Imagine yourself weightless, floating in the sky. Breathe in the air element for 4 breaths.
Facing south – Imagine yourself on fire, feeling the heat of the flames all over. Breathe in the fire element for 4 breaths.
Facing west – Imagine yourself underwater, feeling the coldness of the water. Breathe in the water element for 4…
View original post 117 more words
Beautiful artistic chart gives brief description of Herbs and their Healing Powers. Frame-worthy IMHO.
Beautiful artistic chart gives brief description of Herbs and their Healing Powers. Frame-worthy IMHO.
and

Many of us use candles for comfort, and others look to them for even more. Candle magic can seem as if its complex and complicated, but once you are familiar with it, it can be fun, easy and effective.
First things first. If you are considering candle magic, you must have a clear goal in mind. Think it through thoroughly before you begin. Work only in positivity as negative goals can only bring negative results back to you in the end.
Choose what type of candle you will work with. A free-standing or taper candle is easy as it can be held in the hand, inscribed and anointed without much fuss. If using a glass encased candle, first ascertain whether or not the candle can be removed and replaced within the receptacle. If it is removable, then remove it from the glass and proceed, replacing it when you’ve completed the candle preparation. This will make sense as we we go on.

It is essential to understand the importance of color in candle magic. Below you will find a chart of common uses for candle colors, but more importantly, consider what they mean to you. Take the color red for example; how does a bright red affect you vs a warm dark red? Feel the difference. Feel the colors. Feel their effect upon your emotions. Choosing an appropriate candle color is an important step in achieving your goal.

Once you’ve decided upon your goal and chosen the colors you want to work with, you will cleanse the candle to remove any residual energy that it may have picked up during the manufacturing process. Better yet, if you have made the candle yourself, you will have imprinted it with your intentions from its very inception.
Holding the candle in hand, clean the candle surface from bottom to top with a tissue or cotton cloth dipped into rubbing alcohol to remove these energies. If you intend to work with a glass encased candle, and the candle cannot be removed and replaced into the receptacle, use the alcohol to clean the exterior of the container of any wax and residue. Using alcohol in this initial step allows for complete evaporation of any unwanted residues and energies that may be present.
When you have finished cleansing the candle, you will dedicate it explicitly to the purpose at hand. This is called consecration. There are various methods of consecration,. The processes of affirmation and anointing are described here.

Think about the purpose of the ritual you are about to embark on, and using a sharp object carve into your candle the symbols that will help you to realize your goal. Carve these symbols into the side of the candle, or in the case of a glass encased candle, into the top. For example, if the goal is romance a heart and the initials of your intended could be used. Other symbols such as astrological signs, runes or elements may be used, depending on the outcome you desire. While carving, continue to envision your goals. Chanting or repeating your intentions while carving is especially helpful in focusing your mind and personal energies. This is called affirmation. See * NOTE below.

Next you will anoint your candle with special oils or waters, as you choose. You may use commercial essential oils or specially prepared waters, or create your own personal mixtures. Consider the goal at hand when choosing the compounds you wish to work with. Commercially prepared oils and waters are available for various purposes such as love, prosperity, healing, etc. Use your fingers to rub the entire surface of the candle with the oils. If using waters, mist gently or sprinkle with your fingers. If you are working toward attracting good, such as bringing new love into your life, rub the candle from top to bottom. Alternatively, if you are working toward expelling negativity from your life, such as bad habits, illness or unwanted situations, rub the candle from bottom to top. Use long firm strokes, envisioning adding something to, or removing something from, the candle, and in turn, your life. If you cannot decide which direction you should oil the candle, simply begin in the middle and work your way toward both ends simultaneously. When working with a glass encased candle that cannot be removed from its receptacle, anoint the top and exposed surfaces of the candle, working in a clockwise motion to draw the good and counterclockwise to expel negativity.

Your cleansed and consecrated candle should be used for one purpose only. If you prepare a candle for prosperity purposes, don’t use it for anything else. Decide how often and for how long a time your are going to burn your candle and choose a size according to purpose. If you consider your goal to be very important and essential, you may wish to burn your candle every day for several days, so choosing a very large candle. Alternatively you may choose to use several smaller candles and burn one each day. If you choose to use smaller candles remember to cleanse and consecrate each one before use.
If necessary, replace the candle into its receptacle. Light your candle. Do so consciously. Concentrate on your intentions. Be aware that fire has an affinity with the spiritual plane.

Keeping in mind that positivity is ALWAYS the goal, you may recite the following:

“An it harm none, do what ye will”.
* NOTE: For the beginner, or if you are uncertain of how to use symbols, runes, or inscriptions, there are commercially pre-prepared inscribed candles available at any of metaphysical shop. They are perfectly appropriate for use, provided you follow the cleansing, anointing and intentional rituals just the same.
I like Azure Green for supplies.

WHITE –Self; Protection; Purification; Full Moon Magic; Purity; Innocence; Centering; Truth; Sincerity; Meditation; Peace; Power of a Higher Nature; Greater Attainments in Life; Spirituality.
RED — South; Protection; Strength; Blood; Passion; Courage; Health; Power; Fire Elemental; Sexuality; Vigor; Energy; Enthusiasm; Will Power; To conquer fear or laziness.
LT. BLUE –Healing; Patience; Happiness; Psychic Awareness; Quests; Intuition; Opportunity; Tranquillity; Understanding. Ward Depression; Safe Journey; Harmony in the Home; Peace.
DARK BLUE –The Goddess; West; Water Elemental; Inspiration; Truth; Dreams; Protection; Change; Impulse; Fidelity; Deep Emotion; Peace; Meditation; Changeability; Psychism.
GREEN –North; Money; Fertility; Growth; Employment; Earth Elemental; Herb Magic; Luck; Healing; Balance; Prosperity; Courage; Nature type Faerie-magic; Garden blessing; Abundance; Generosity; Renewal; Marriage.
YELLOW –East; Air Elemental; Intellect; Creative Work; Learning; Changes; Confidence; Attraction; Harmony; Clairvoyance; Charm; Imagination; Power of the Mind; Gentle persuasion; Action.
BROWN –Earth Elemental; Animal Health; Endurance; Steadiness; Houses & Homes; Physical Objects; Overcoming uncertainty and hesitancy; Attract Money and Financial Success; Concentration; ESP; Intuition; Study.
PINK –Love; Peace; Femininity; Friendship; Honor; Morality; Emotional Love; Affection; Romance; Spiritual Awakening; Healing of the Spirit; Togetherness.
ORANGE –The God; Attraction; Stimulation; Energy; Healing; Vitality; Encouragement; Adaptability; Luck; Pulling things to you; Clearing the Mind; Dominance, Sudden Changes; Change Luck.
PURPLE –Power; Dignity; Spiritual Development; Meditation, Spirituality; Intuition; Ambition; Spirit Communication; Tension; Business Progress; Healing Severe Diseases; Occult Wisdom; Success; Idealism; Higher Psychic Ability; Break Bad Luck; Drive Away Evil; Honors.
GOLD –The God; Solar Energy; Physical Strength; Power; Success; Mental Growth; Skill Sought; Healing Energy; Fortune; Divination; Creative Work; Intuition; Money; Fast Luck; Attracts Higher Influences.
SILVER –The Goddess; Lunar magic; Removes negative forces; Opens astral gates; Conducts Energy; Meditation; Creative Work; Protection; Money; Psychic Development; Success; Balance; Ward Negativity; Remove Negative Energy; Stability; Victory.
VIOLET –Self Improvement; Intuition; Success in searches; Creative Work.
BLACK –Endings; Closing of Doors; Psychic Work; Death; Ward Negativity; Remove Hexes; Protection; Spirit Contact; Truth; Remove Discord or Confusion; Reversing; Releasing; Repel Dark Magic and Negative Thought Forms.
GREENISH-YELLOW –To Negate; Discord, Sickness, Anger, Jealousy, Cowardice, Anger.
INDIGO–Meditation; Spirit Communication; Karma Working; Balance; Learn the Ancient Wisdom; Neutralize Another’s Magic; Ward Slander, Lies or Undesirable Competition
GRAY –Non-Nature Faerie Magic; Travel to Otherworld; Vision Quests; Veiling; Cancellation; Hesitation; Competition.
LAVENDER –Spiritual Development; Psychic Growth; Divination; Sensitivity to the Otherworld; Blessings.
MAGENTA –Very High Vibrational Frequency that tends to work fast so usually burned with other candles; Quick Change; Spiritual Healing, Exorcism.

This is Easy and its Fun, but it takes some time to finish properly. I recommend reading through the entire Tutorial before getting started. There are a couple of important points that you’ll want to consider before you get going. Above all, Enjoy and Have Fun!
Normally when making Herbal Oil Infusions I would leave the herbs or flowers in the oil on a sunny windowsill for a couple of weeks, even a month, stirring occasionally, pressing the old herbs and adding new. That’s the best way to do it.
BUT, I needed a fast-track way to have some lovely herbal infused oil..well, actually, floral-infused oil by Sunday morning and it was Thursday! Uh Oh!
The cure? I mixed my flower tops in the oil just as I would for a long-term infusion, but decided to slowly and gently heat them in a heat-proof glass container atop a double boiler. The glass container is not touching the water, so that only the steam reaches the herbal mix. I am keeping the water at the lowest simmer that will make a small amount of steam.
I let this infuse all day then cool, press the floral mix, add new flower heads, cover again with the strained and pressed oil, and steam all the following day. On Saturday I strained and pressed the oils.

On Sunday I will use my newly created Infused Oil to make a lovely sugar scrub for a party that afternoon.
I will let you all know how I like the results, or better yet, how the ladies like the results when they use their scrubs at home after the party.
Make Your Own
HERBAL OIL INFUSION
on the
FAST TRACK
In this Recipe I am making a Lavender, Red Rose and Chamomile Infusion. You may substitute the flowers and/or herbs of your choice.
INGREDIENTS
2 cups dried herbs or flower heads
2 cups organic extra virgin coconut oil (76 or 96 degree)
(substitute almond, grapeseed or olive oil if coconut oil is not available, do not use blended vegetable oils such as cooking oil)
Water

What You’ll Need
SUPPLIES
Heat-Proof Glass Container (I am using a large 3 qt measuring cup)
Medium to Large Pot (should be large enough to hold glass container high enough to avoid the water and snug enough so that the container will not slip during the process)
Wooden Mixing Utensil
Funnel or Large Bowl
Sieve
Cheesecloth or Unbleached Muslin (unbleached cotton if that’s what you have)
Clean DRY Glass Container with Lid (mason jar, clean dry mayo jar, etc.)
Large Rubber Band

RECIPE
DAY 1
Fill your pot half way with cool water, turn on high heat and bring to boil.
Turn heat to medium low, and adjust to just a low simmer.
In your large heat-proof glass container, add 1 CUP ONLY of your herbs/flowers and pour all of the coconut oil over top
(coconut oil may not all come out of container, if that’s the case, invert the container atop the mixture while its steaming. very shortly the oil will melt and you’ll be able to get it out)
Stir to blend.
Carefully place glass container in the top of the pot full of simmering water, being sure that the top of the water does not touch the bottom of the glass container.
Allow the mixture to steam over SLOWLY simmering water for 6 hours, replacing water as it evaporates.
Allow to cool off enough to work with by hand.
Place a single layer of unbleached cheesecloth, muslin or cotton over the container
Secure with a rubber band
Carefully turn the glass container upside down over the large bowl
Use a funnel to work with a smaller bowl
Allow the container to remain upside down, covered with the cloth, until all the oil drains into the second bowl
When all the oil has seeped into the second bowl, its time to Press
To Press the herbs, wrap the strained mixture of herbs/flowers in a large piece of muslin, cheesecloth or unbleached cotton, OR use a large unbleached reusable tea bag or cloth sack and fill with the flower mixture. Tie securely with cotton string or hemp cord.
Place the wrapped mixture in your sieve over the bowl or use another clean DRY bowl if you like.
Press the wrapped mixture down against the sieve with your wooden utensil, a mallet, or (and this is what I do) place a heavy object such as a stone mortar/pestle or a second smaller but heavy bowl atop the wrapping and weight it with crystals or other heavy objects.
BE SURE that the object or utensil that you use is CLEAN and BONE DRY! You don’t want to get any water into your infusion, this can end up causing you mold problems and ruining all your work.
Allow all the remaining oils that you can squeeze from the herbs/flowers to drain into the bowl.
Now get ready to start all over again…..
If you are going to wait until tomorrow, then cover your container and place in a cool dry place, but NOT the refrigerator.
DAY 2
In your makeshift double boiler bottom pot, again, heat 1/2 pot water to boiling. Reduce heat to a slow simmer.

Place your saved, strained and pressed oil, in your heat-proof glass container, over the water, but not touching.
Add 1 CUP of the herb/flower mixture
Stir to blend.
Allow to steam another 6 hours, replacing water in the pot when needed.
Stir occasionally.
After 6 hours:
Remove from heat,
Cool to touch
Strain and Press same as on Day 1
Transfer to a CLEAN and BONE DRY glass container
Cover with a clean and BONE DRY lid, secure.
Now you are ready to use your New Herbal Oil Infusion in your soaps, homemade skin care creams, or even in cooking!
Pat yourself on the back…you’ve done a great job!
AND you’ve made an all natural, good for you, good for the Earth, product that you can be truly proud of!
Please…let me know how your Infusion turned out.
Experiment with different oils, herbs, flowers, etc.
Hope You Had Fun!
IMPORTANT TIPS
Never use a metal container.
Never boil or overheat your mixture.
Make sure to keep checking your pot to be sure there’s enough water to produce steam.
KEEP WATER OUT OF YOUR MIXTURE AT ALL TIMES
Shelf Stable for Approximately 6 Months.
There are many and varied methods for cleansing and charging crystals, some are simple and some very elaborate.
The method described here is relatively simple and very effective.
Relax and Enjoy.

Crystal energy can be used for emotional, physical, and spiritual healing by balancing and stimulating positive energy in the mind/body. Crystals pull positive energies to you, and the more you use them, the more of a bond you form. Oddly, this same frequent use of your crystals can weaken their energy and effectiveness. To prevent this from happening, charge your crystals regularly. The process is an easy one, but I suggest you wait for the Full Moon and for a time when you can be calm and relaxed to more easily direct your most positive energies.

When you take your crystals home its time to do your part. First, make sure the crystals remain clean and free of earth and dirt. Should they be soiled, simply rub them down with a soft organic cloth. As a last resort you may use a soft bristle brush, as you want to disturb them as little as possible. Once this is done, you are ready to cleanse your crystals. Cleansing is the first step in readying your crystals to accept your best energies and intentions.
Choose the crystals that you want to work with based on the outcome that you are looking for. Clear Quartz Crystal absorbs negativity and allows you to instill a most positive and energetic atmosphere in yourself and your sacred space. Clear Quartz Crystals can take the place of other crystals that are unavailable to you at any given time. Clear Quartz and Rose Quartz Crystal are among the easiest to start out with. Rose Quartz is excellent for enhancing your intentions and filling your space with love and positivity. Amethyst also easily accepts positive energy and will ease stress and instill calmness in yourself and all around you.
On the evening of the Full Moon, cleanse each crystal by running cool water over it as you hold it in your hand. Place them in an earthen or glass bowl and cover with well water or purified water. Gently mix in a small amount of natural sea salt. Now place the bowl of water and crystals on the ground under the moonlight, preferably a Full Moon. Let it remain there for at least 24 hours, and even better, from one Full Moon to the next . Take care to either end the cleansing at this Full Moon or in the Waxing-to-Full Moon phase of the next. I do not advise ending cleansing in any other moon phase other than the Waxing or Full Moon. When your crystals have absorbed the Full Moon energy, rinse them under cool running water, being sure to gently handle them as you do. When a connection is made, you will “feel” that the cleansing process has been completed. When you have reached that stage, allow your crystals to air dry.

After cleansing, you may want to charge your crystal with a specific power. Charging crystals is an essential part of working with them as tools. Again, crystals are charged with your personal energy during the Full Moon. Before charging your crystal, carry it around in your pocket or wear it around your neck for a few days, being sure not to carry it with metallic or magnetic objects, such as your keys or phone. Keeping the crystal close to you helps strengthen the bond between your crystal and your own personal energy.
Charging your crystals during the Waxing or Full Moon will ready them to aid you in a fresh start and in seeking out your desires . Charging your crystal under the waxing moon aids in positivity and in the intention of gaining something that you want or need. Working in the waning or new moon is a bit more tricky, as some may use this in a negative manner. But as you gain more experience, charging under a waning or new moon could help you to achieve a lessening effect on something, such as debts or illness. Until you gain more knowledge, it is best to work in the Waxing to Full Moon with all of your crystals.
As important as cleansing is imparting them with your intent for their work, using the elements of air, fire, water, and earth. Charging your crystals with a specific energy is a moving and powerful experience. Find a place of peace and quiet within your home and space. Sit still and relax, concentrating on your intent and focusing your energies. Decide what you wish to impart to your crystals.
Unwanted feelings may surface when working with crystals. That’s OK. You may choose to protect yourself with meditation or a prayer of your choosing. Ask for guidance, allowing all your feelings to flow, acknowledging them and creating an aura of pure love.
Picking up a single stone in your dominant hand as you visualize your intent and what you would like to gain from your crystals. Relax. Direct these energies into the stone that you are holding. Try to actually visualize the energy going out from your body and into the stone. You might try seeing it as a line of light flowing from you to the stone. As you charge the crystal, visualize it glowing with the light of your energy. When the stone has received your energy and intent, you will feel it within the crystal, and as with the cleansing, and you will then know that the process has been completed. When you have finished charging the stones, wrap them individually in a soft, unbleached organic cloth such as a natural cotton or silk. Thank the spirits for the guidance they have provided you.

Some may choose to perform a more elaborate charging ritual. The basics are the same, the feelings are the same, only the tools are different. To do this you will need an incense stick, natural essential oil such as sandalwood, amber, lavender or frankincense, a red candle, well-or-purified water, a small earthen bowl or other natural receptacle, and a small plot of soil such as in a flower pot. Light a stick of incense and the red candle to represent the elements, air and fire. Pass the crystal through the smoke to charge with the energies of air. Pass the crystal through the candle flame to charge with fire energy. Sprinkle purified water from the bowl onto the stone, charging it with the energy of water. Place the crystal in the soil and visualize the earth’s energy charging your crystal. Finally, rub the essential oil over the stone to charge it with your very own energy. Give thanks to the elements and to Mother Earth for aiding you in your endeavor. Again, wrap your crystal in a small piece of organic silk or cotton.
Keep your crystals clean by polishing gently with a soft cloth, and keep the energy pure by wrapping them or keeping them in a soft organic cotton or silk bag. This will keep impurities from changing or weakening the energy and intentions you have placed within your crystal. Keep it with you, in your pocket, wear it around your neck, or simply hold it in your hand to guide you clearly and purely in all your endeavors. You may choose to gently rub essential oil of lavender onto your crystal to aid in calming and soothing. Have fun and experiment with essential oils for their metaphysical and healing properties.

Thanks for stopping by,
Peace,
Jo
Life In The Making
A great WordPress.com site
Great reads from across WordPress.com, updated daily.
Just another WordPress.com site
the ramblings of a book fanatic and t.v. show enthusiast
Comment & Share with Mikey of The Crochet Crowd
.... making things and more ....
4 out of 5 dentists recommend this WordPress.com site
The website where movies count
For All Who Are On A Spiritual Path To Re-Connect With Their Divine Truth. This is part of My Path and Truth.. Writer, Speaker, Truth Seeker, Spirit Having A Human Experience & Life Coach.
Articles about the art of living from the heart. Allow more Zen to enter your life. All articles written by Nino.
Insights for Spiritual Living
Coming out of the Broom Closet & Walking My OWN Sacred Plank
The completely irrelevant musings of one insignificant initiate into the 7FW
And I breathe
Author
Poetry of the Soul
Zingendewoorden